
Let's consider common scenarios:
a user on your website tries to upload a photo or another image, but encounters a frustrating error message stating that the file size is too large;
your website actively uses images submitted by users, and as your audience grows, you increasingly experience server performance degradation, or even server crashes.
This article proposes a solution to these problems by modifying and/or creating image files "on the fly" just before sending them to the server. (Spoiler: it's simple). Here you will find comprehensive information for developing custom scripts, as well as a ready-made solution that you can simply connect and use.
So, the essence is simple
- We take the image file data (a "File" class instance), for example, from a user-filled input element of type "file" (the necessary data is in the input.files list).
- Then, using this data, an "Image" element ("img") is created and placed on a specially created "canvas" element of the desired size, where automatic scaling and adjustment to the desired dimensions take place.
- After that, using built-in methods, the contents of the "canvas" are saved in the desired format with the desired quality as another "File" instance. This is the new file we created with the specified characteristics.
- Finally, we do what we need with this file. For example, we immediately add it to a FormData and send it using Ajax, or replace the original file in the input element and use the standard form submission, or populate hidden input elements with files for variations of the uploaded image in different sizes.
The code
window.onload = () => {
  /*
    This is an asynchronous function that accepts an image file image_file and returns a new image file with the following characteristics:
    type (String) - image type/format; supported types are jpeg, png, webp, and gif
    height (Float) - height in pixels
    width (Float) - width in pixels
    quality (Float) - quality from 0 to 1; available only for jpeg and webp (browsers typically set ~ .95 by default)
    file_name (String) - file name
  */
  const resize_image = (image_file, type, height, width, quality, file_name) => new Promise((resolve, reject) => {
      // Create an Image element and populate it
      const img = new Image();
      img.src = URL.createObjectURL(image_file);

      // Wait for loading to complete
      img.onload = () => {
          const
              // Create a canvas and 2d context
              canvas = document.createElement('canvas'),
              ctx = canvas.getContext('2d');

        // Set the canvas dimensions to the desired ones
        canvas.setAttribute('width', width);
        canvas.setAttribute('height', height);

        // Place the image in the context to fill the entire canvas
        ctx.drawImage(img, 0, 0, width, height);

        // Save the canvas contents as blob data
        canvas.toBlob(blob => {
            // Create the target File instance from the blob and return it
            const new_file = new File([blob], file_name, {type: 'image/'   type, lastModified: Date.now()});
            resolve(new_file);
        }, 'image/'   type, quality);
      };
  });

  // Create an input element and place it directly in the body
  const file_input = document.createElement('input');
  document.body.append(file_input);
  file_input.type = 'file';

  // Wait for user file input
  file_input.addEventListener('change', () => {

    // Use the function created above
    resize_image(file_input.files[0], 'jpeg', 200, 300, 0.8, 'resized_img.jpg').then(new_image_file => {

      // Create an img element, populate it, and place it after the input element to observe the result
      const new_img = new Image();
      new_img.src = URL.createObjectURL(new_image_file);
      document.body.append(new_img);

      /*
        Thus, using DataTransfer, set the new content for the input file element;
        specifically, replace the first file selected by the user with the one we created
      */
      const dt = new DataTransfer();
      dt.items.add(new_image_file);
      file_input.files = dt.files;
    });
  });
 };
Ready-made Solution
Created, as you might guess, by me.
It's called Uploading-Image-Resizer.
It's located on GitHub here.
Interactive demo is here. Use it not only to evaluate the work "in action" but also to select the most suitable options for your specific needs.
How to Use
Note: This information will be repeated frequently. This is done intentionally so that you don't have to re-read the entire article to clarify specific details; read it "diagonally".
There are two ways to use it:
conditionally "high-level", using the data-uploading-image-resizer attribute of the input element;
conditionally "low-level", using the corresponding function resize_image_file(image_file, options).
<script language="JavaScript" src="./uploading_image_resizer.js"></script>
Write the attribute data-uploading-image-resizer in the target input element and fill it with the options you need, separated by commas.
Example:
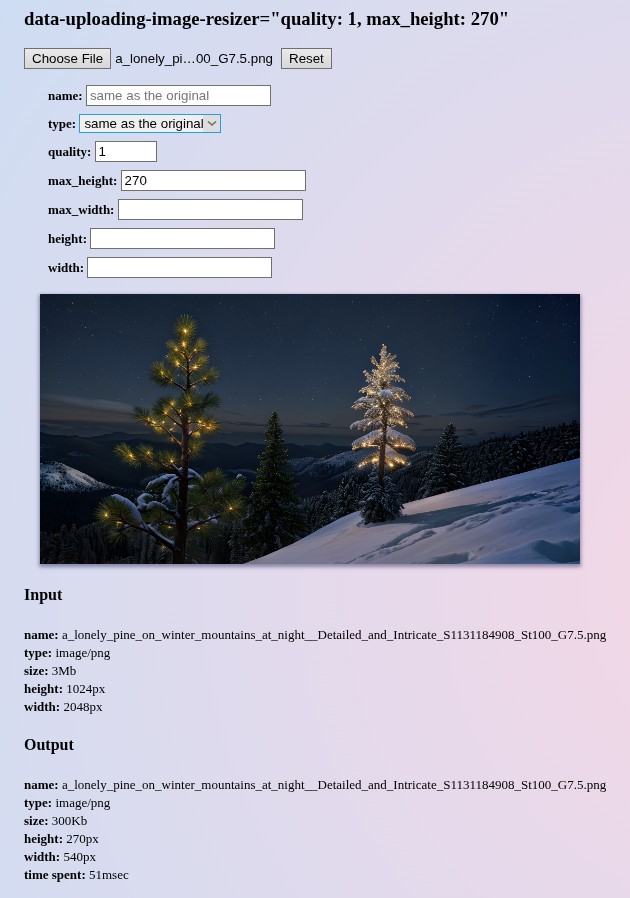
<input type=file name=my_image data-uploading-image-resizer='max_height: 700, max_width: 900, type: jpg, quality: 0.85'>
All options
- type (String) - image type; available types are jpeg, png, webp, and gif (if not specified, the original type is retained)
- max_height (Float) - maximum image height in pixels (size is changed only if the original height exceeds this parameter)
- max_width (Float) - maximum image width in pixels (size is changed only if the original width exceeds this parameter)
- quality (Float) - quality level from 0 to 1; available only for jpeg and webp types (default is 1)
- name (String) - file name; the file extension can be used to specify the required type (if not specified, the original name is retained)
- height (Float) - image height in pixels
- width (Float) - image width in pixels
- callback (String) - name of the callback function, called when the file modification is complete. Arguments passed to the function: -node (HTMLInputElement) - target input element; -extra_ls (Array) - list of additional data in the format:js123456789101112131415161718
{ input: { file: file, // (Object instance File) - original image file name: file name, // (String) - original file name type: file type, // (String) - original file type size: file size, // (Float) - original file size in bytes height: image height, // (Float) - original image height in pixels width: image width // (Float) - original image width in pixels }, output: { file: file, // (Object instance File) - modified image file name: file name, // (String) - modified file name type: file type, // (String) - modified file type size: file size, // (Float) - modified file size in bytes height: image height, // (Float) - modified image height in pixels width: image width // (Float) - modified image width in pixels } }html123456789<!-- Example: --> <input type=file name=my_image data-uploading-image-resizer='max_height: 700, max_width: 900, type: jpg, callback: foo'> <script> function foo(node, extra_ls){ console.log(JSON.stringify(extra_ls)); } </script> target (String) - identifier of the input file element, assigned as the target; used to create multiple modified versions of the same image.
html123456789<!-- Example: --> <input type=file id=origin_img name=origin_img> <input type=file name=medium_img style='display: none' data-uploading-image-resizer='target: origin_img, type: webp, max_height: 1080, max_width: 1920'> <input type=file name=small_img style='display: none' data-uploading-image-resizer='target: origin_img, type: webp, max_height: 500, max_width: 850'> <!-- It can be combined with changing the original itself. Example: --> <input type=file id=origin_img name=big_img data-uploading-image-resizer='type: webp, max_height: 2000, max_width: 4000'> <input type=file name=medium_img style='display: none' data-uploading-image-resizer='target: origin_img, type: webp, max_height: 1080, max_width: 1920'> <input type=file name=small_img style='display: none' data-uploading-image-resizer='target: origin_img, type: webp, max_height: 500, max_width: 850'>
Using the image transformation function directly
resize_image_file(image_file, options)

Arguments:

-  image_file (instance File) - image file as blob data; can be taken from input.files or created dynamically
-  options (Object) - options in the form of an object (almost completely matches the options for the attribute listed above)

All options:

-   type (String) - image type; available types are jpeg, png, webp, and gif (if not specified, the original type is retained)
-   max_height (Float) - maximum image height in pixels (size is changed only if the original height exceeds this parameter)
-   max_width (Float) - maximum image width in pixels (size is changed only if the original width exceeds this parameter)
-   quality (Float) - quality level from 0 to 1; available only for jpeg and webp types (default is 1)
-   name (String) - file name; the file extension can be used to specify the required type (if not specified, the original name is retained)
-   height (Float) - image height in pixels
-   width (Float) - image width in pixels
-   get_extra_data (Boolean) - the function returns additional data instead of just the blob data file (default is false)
    Additional data is in the format:
        {
            input: {
                file: file, // (Object instance File) - original image file
                name: file name, // (String) - original file name
                type: file type, // (String) - original file type
                size: file size, // (Float) - original file size in bytes
                height: image height, // (Float) - original image height in pixels
                width: image width // (Float) - original image width in pixels
            },
            output: {
                file: file, // (Object instance File) - modified image file
                name: file name, // (String) - modified file name
                type: file type, // (String) - modified file type
                size: file size, // (Float) - modified file size in bytes
                height: image height, // (Float) - modified image height in pixels
                width: image width // (Float) - modified image width in pixels
            }
        }

Returns:

Promise -> (instance File) new image file data, if get_extra_data is false, otherwise additional data (see above).

<!-- Example: -->

<input type=file id=img_file>

<script>
    const input_file = document.getElementById('img_file');
    input_file.addEventListener('change', () => {
        if(!input_file.value) return;
        resize_image_file(input_file.files[0], {heigth: 200, get_extra_data: true}).then(res => {
            console.log(res);
            const img = new Image();
            img.src = URL.createObjectURL(res.output.file);
            document.body.append(img);
        });
    });
</script>